Navigation 3 is a new Compose based navigation library from Google that’s designed with ease of use and flexibility in mind.
With Navigation 3, you have full control over your back stack, and navigating to and from destinations is as simple as adding and removing items from a list.
As with a number of the other Jetpack libraries, JetBrains maintain their own fork that works with Compose Multiplatform. In this article we’re going to outline how we can use Navigation 3 in the FantasyPremierLeague Compose Multiplatform sample. Note that all the code shown here is defined in commonMain in the project’s shared KMP code.
Implementation
We firstly add the following Navigation 3 dependencies (using the JetBrains versions of the library). As well as the core ui dependency we’re also including the Material3 Adaptive Navigation3 library (we’ll show later in the article how that can be used to implement adaptive layouts).
libs.version.toml
1
2
3
4
5
6
androidxNavigation3UI = "1.0.0-alpha04"
androidxNavigation3Material = "1.3.0-alpha01"


androidx-navigation3-ui = { module = "org.jetbrains.androidx.navigation3:navigation3-ui", version.ref = "androidxNavigation3UI" }
androidx-navigation3-material3-adaptive = { module = "org.jetbrains.compose.material3.adaptive:adaptive-navigation3", version.ref = "androidxNavigation3Material" }
build.gradle.kts
1
2
implementation(libs.androidx.navigation3.ui)
implementation(libs.androidx.navigation3.material3.adaptive)
Next up we define the following keys/routes which will be used to map to particular content in the app. We’re also defining “top level” routes here which we’ll use in our NavigationBar implementation.
Note that we’re using @Serializable here to allow making the back stack persistent.
1
2
3
4
5
6
7
8
9
10
11
12
13
14
15
16
17
18
19
20
21
22
23
24
25
26
27
28
29
30
31
32
33
34
@Serializable
private sealed interface Route

@Serializable
private sealed interface TopLevelRoute: Route {
    val icon: ImageVector
    val contentDescription: String
}

@Serializable
private data object PlayerList : TopLevelRoute {
    override val icon = Icons.Default.Person
    override val contentDescription = "Players"
}

@Serializable
private data class PlayerDetails(val playerId: Int) : Route

@Serializable
private data object FixtureList : TopLevelRoute {
    override val icon = Icons.Filled.DateRange
    override val contentDescription = "Fixtures"
}

@Serializable
private data object League : TopLevelRoute {
    override val icon = Icons.AutoMirrored.Filled.List
    override val contentDescription = "Leagues"
}

@Serializable
private data object Settings : Route

private val topLevelRoutes: List<TopLevelRoute> = listOf(PlayerList, FixtureList, League)
We then create our back stack and use NavDisplay to manage our app’s key/content mapping (along with navigating to and from destinations by adding and removing items from that back stack).
1
2
3
4
5
6
7
8
9
10
11
12
13
14
15
16
17
18
19
20
21
22
23
24
25
26
27
28
29
30
31
32
33
val backStack: MutableList<Route> =
    rememberSerializable(serializer = SnapshotStateListSerializer()) {
        mutableStateListOf(PlayerList)
    }

Scaffold(
    bottomBar = { FantasyPremierLeagueBottomNavigation(topLevelRoutes, backStack) }
){
    NavDisplay(
        backStack = backStack,
        onBack = { backStack.removeLastOrNull() },
        entryProvider = entryProvider {
            entry<PlayerList> {
                PlayerListView(
                    onPlayerSelected = { player ->
                        backStack.add(PlayerDetails(player.id))
                    },
                    onShowSettings = {
                        backStack.add(Settings)
                    }
                )
            }
            entry<PlayerDetails> { key ->
                val viewModel = koinViewModel<PlayerDetailsViewModel>()
                viewModel.setPlayer(key.playerId)
                PlayerDetailsView(viewModel, popBackStack = { backStack.removeLastOrNull() })
            }
            entry<FixtureList> { FixturesListView() }
            entry<League> { LeagueListView() }
            entry<Settings> { SettingsView { popBackStack = backStack.removeLastOrNull() } }
        }
    )
}
And finally this is how we setup our NavigationBar to use those top level routes mentioned earlier (again we navigate to particular content by just adding entries to our back stack).
1
2
3
4
5
6
7
8
9
10
11
12
13
14
15
16
17
18
19
20
21
22
23
24
@Composable
private fun FantasyPremierLeagueBottomNavigation(
    topLevelRoutes: List<TopLevelRoute>,
    backStack: MutableList<Route>
) {
    var selectedType by remember { mutableStateOf<TopLevelRoute>(PlayerList) }
    NavigationBar {
        topLevelRoutes.forEach { topLevelRoute ->
            NavigationBarItem(
                icon = {
                    Icon(
                        imageVector = topLevelRoute.icon,
                        contentDescription = topLevelRoute.contentDescription
                    )
                },
                selected = topLevelRoute == selectedType,
                onClick = {
                    selectedType = topLevelRoute
                    backStack.add(topLevelRoute)
                }
            )
        }
    }
}
Adaptive Layout
As mentioned earlier we can also support adaptive layouts using the Material3 Adaptive Navigation3 library. In our example we do this by firstly creating the appropriate SceneStrategy (ListDetailSceneStrategy in our case).
1
2
3
4
5
6
val windowAdaptiveInfo = currentWindowAdaptiveInfo()
val directive = remember(windowAdaptiveInfo) {
    calculatePaneScaffoldDirective(windowAdaptiveInfo)
        .copy(horizontalPartitionSpacerSize = 0.dp)
}
val listDetailStrategy = rememberListDetailSceneStrategy<Any>(directive = directive)
We then pass that strategy to NavDisplay along with now using the appropriate metadata values as shown below.
1
2
3
4
5
6
7
8
9
10
11
12
13
14
15
16
17
18
19
20
21
22
23
24
25
26
27
28
29
30
31
32
33
34
35
36
37
38
39
40
41
NavDisplay(
    backStack = backStack,
    onBack = { backStack.removeLastOrNull() },
    sceneStrategy = listDetailStrategy,
    entryProvider = entryProvider {
        entry<PlayerList>(
            metadata = ListDetailSceneStrategy.listPane(
                detailPlaceholder = {
                    Box(
                        modifier = Modifier.fillMaxSize(),
                        contentAlignment = Alignment.Center
                    ) {
                        Text(
                            text = "Choose a player from the list",
                            textAlign = TextAlign.Center
                        )
                    }
                }
            )
        ) {
            PlayerListView(
                onPlayerSelected = { player ->
                    backStack.add(PlayerDetails(player.id))
                },
                onShowSettings = { backStack.add(Settings) }
            )
        }
        entry<PlayerDetails>(
            metadata = ListDetailSceneStrategy.detailPane()
        ) { key ->
            val viewModel = koinViewModel<PlayerDetailsViewModel>()
            viewModel.setPlayer(key.playerId)
            PlayerDetailsView(
                viewModel,
                popBackStack = { backStack.removeLastOrNull() })
        }
        entry<FixtureList> { FixturesListView() }
        entry<League> { LeagueListView() }
        entry<Settings> { SettingsView { popBackStack = backStack.removeLastOrNull() } }
    },
)
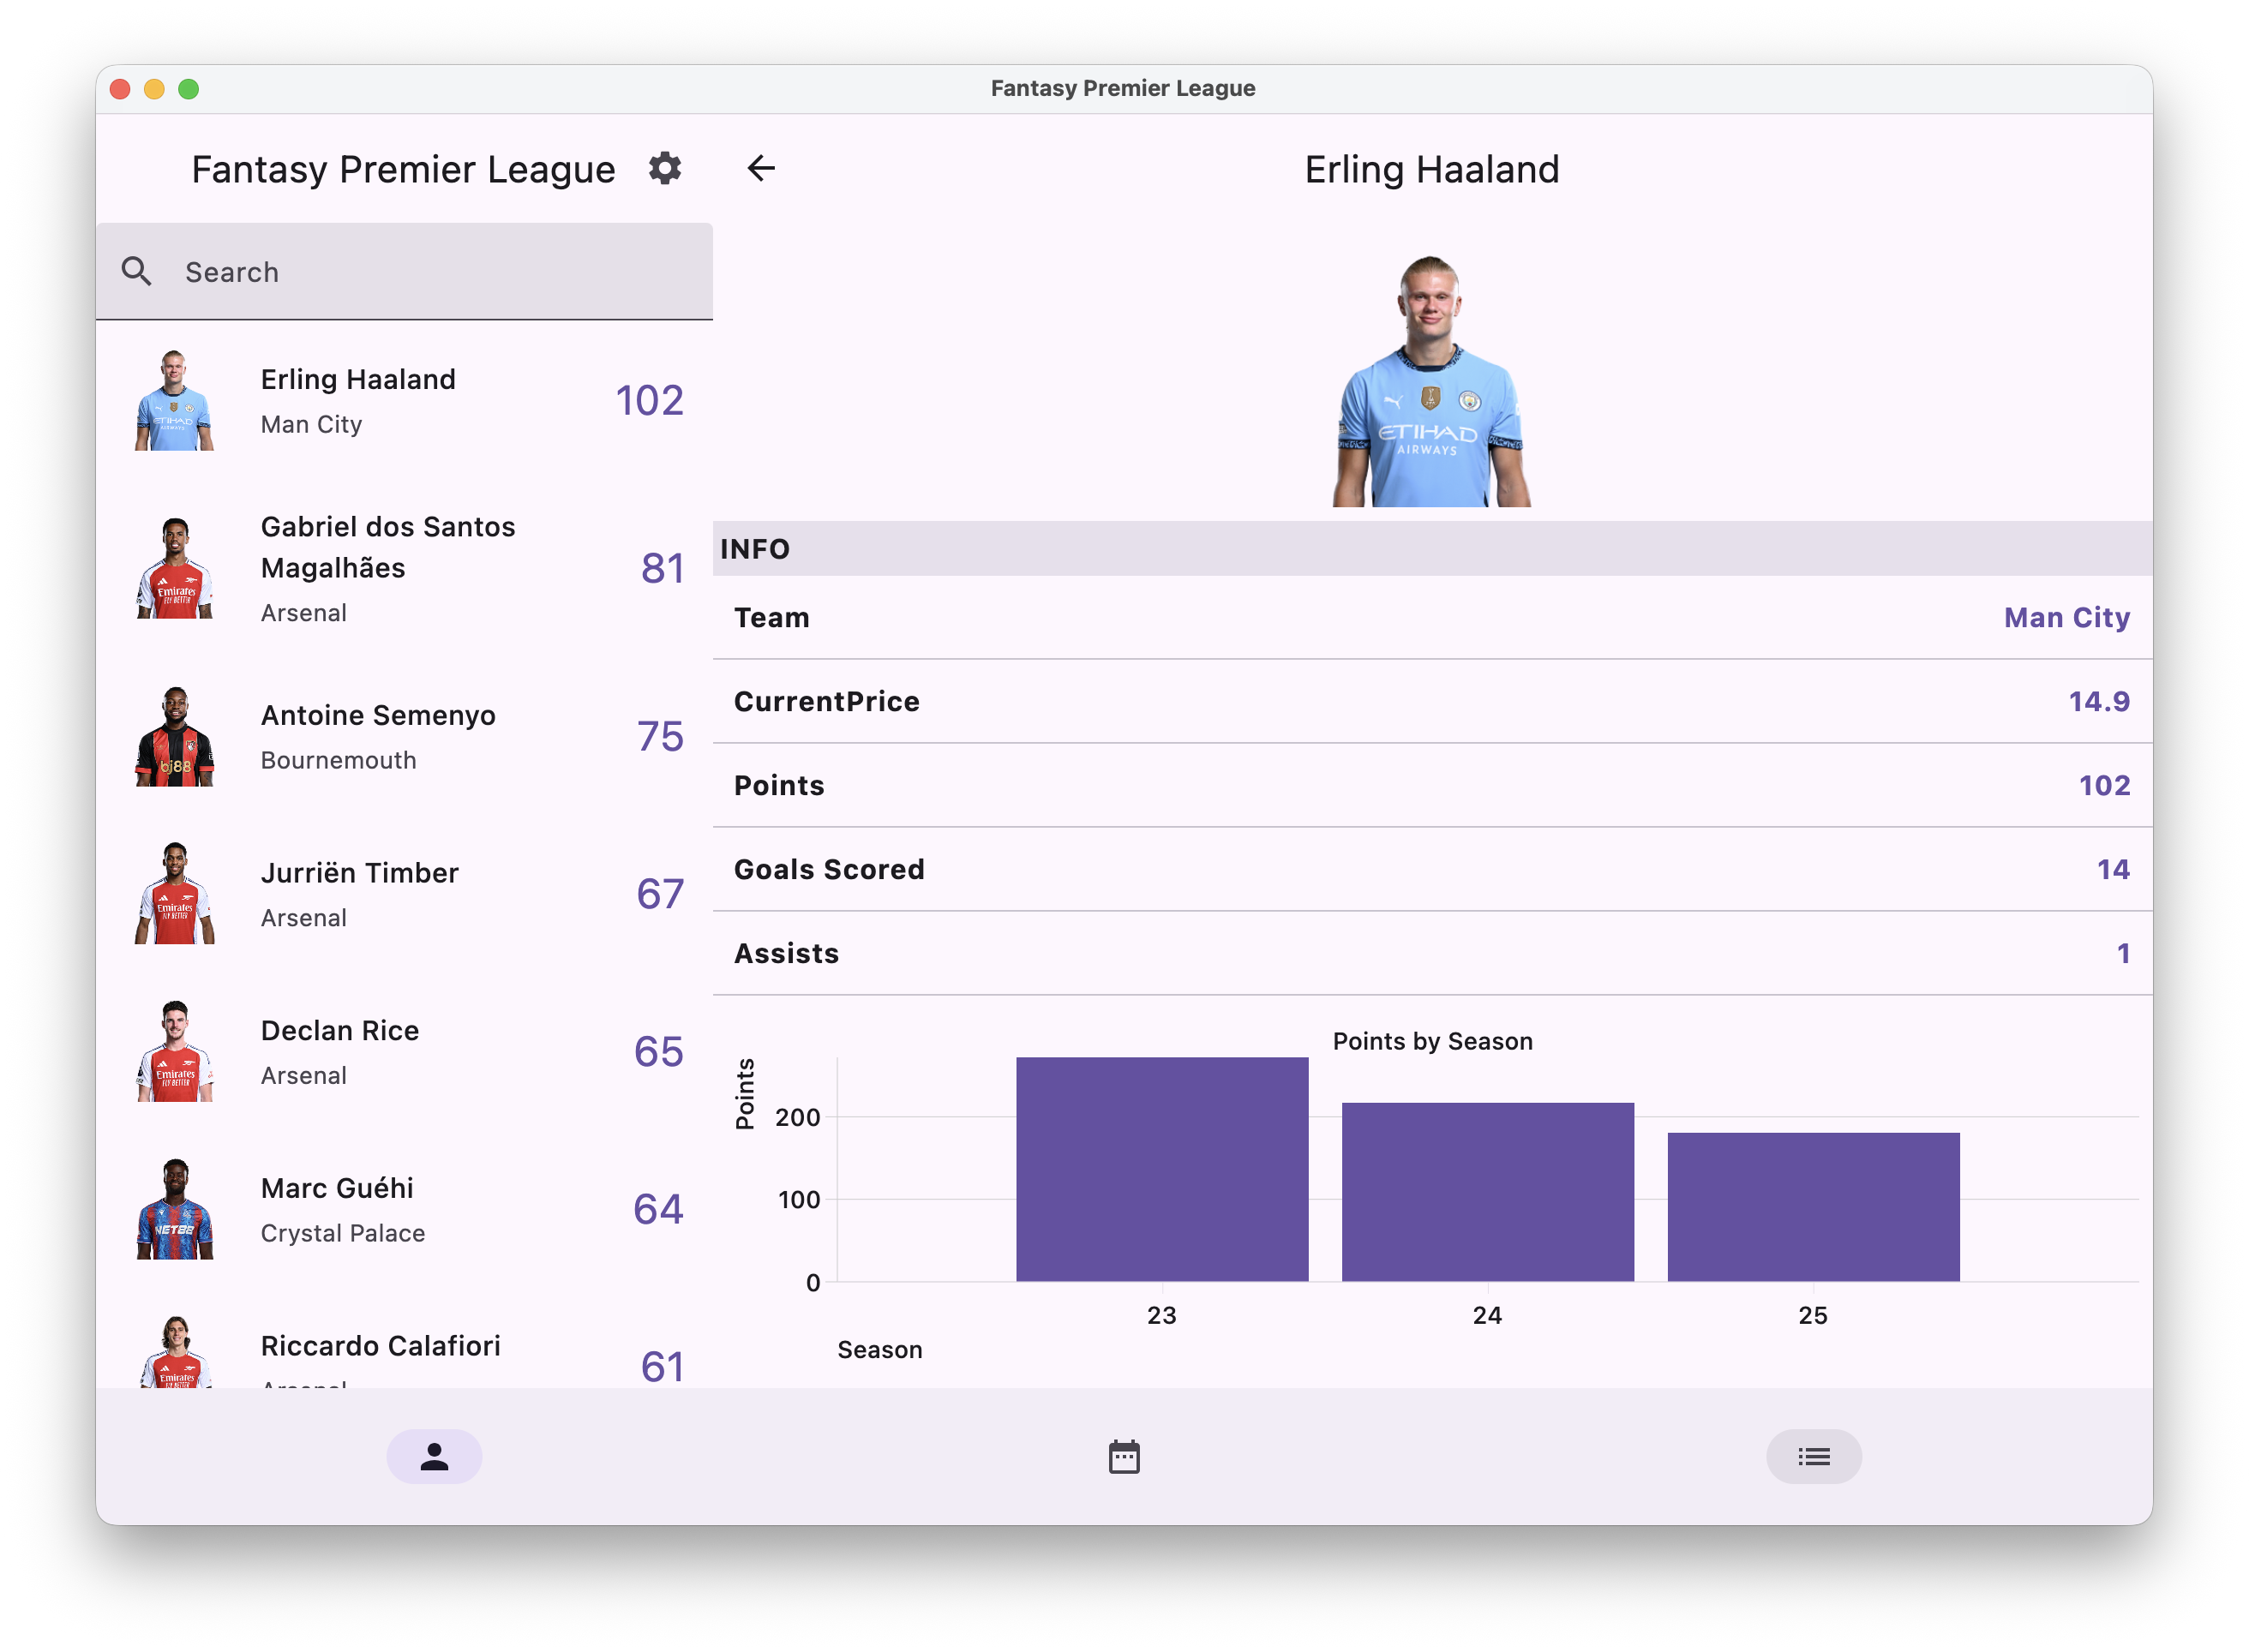
With these changes we now have an adaptive list/detail layout that adjusts accordingly as the window size changes (this screenshot is from the Compose for Desktop client but works in exactly the same way in the Android and iOS clients).
Note that several other navigation use cases are covered in the excellent Navigation 3 - Code recipes repository.
Featured in Kotlin Weekly Issue #486, Android Weekly #702 and jetc.dev Newletter Issue #291
Related tweet
Using Navigation 3 with Compose Multiplatform #KMP #CMP https://t.co/aeUR018DkU
— John O'Reilly (@joreilly) November 16, 2025